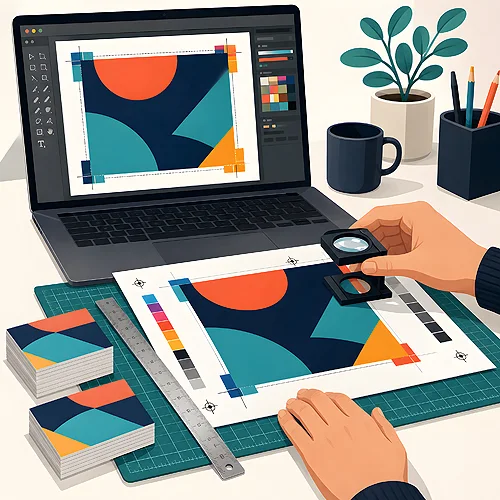
Have you ever seen a print with a thin white strip on one side, and text dangerously brushing the edge? That is not chance or a printer's slip-up - most often it is the result of skipping three simple concepts. The bleed, the safety margin and the trim line are a trio that together decide whether the edge of a print is clean and professional. It sounds technical, but in a moment you will see it is ordinary logic - and that you will master it in a few minutes.
- The trim line is where the guillotine cuts the print to the final format.
- The bleed is graphics extended 3 mm beyond the trim line - a reserve outward.
- The safety margin is the gap of content from the edge - a reserve inward.
- The guillotine has a cutting tolerance, which is why both reserves are needed.
- A missing bleed risks a white strip, text too close to the edge risks a cut-off.
The best way to understand these concepts is to look at one concrete thing: a stack of printed sheets that the machine cuts to the finished format. Everything else follows from that one moment - the cut.

The trim line - where your print ends
Let us start from the middle, that is the trim line. It is a notional border where the guillotine cuts the sheet to the final size. Everything inside this line stays - that is your finished product. Everything outside is cut off and thrown away.
You can picture it like a photo frame: what is in the frame stays on the wall, and what is beyond it disappears. The trim line marks exactly that frame. In practice it corresponds to the format you order - if you make a 90 × 50 mm business card, the trim line runs along its edges and the file with the bleed measures 96 × 56 mm. It is the point of reference for the other two concepts: the bleed is just beyond it, and the margin just before it.
Why the cut is not perfect
Here we get to the heart of it. If the guillotine knife always hit the exact same spot to the hair, no reserves would be needed. But reality is different. The machine cuts a thick stack of sheets at once, the paper can shift slightly, and the knife has its natural cutting tolerance - a deviation of a fraction of a millimetre one way or the other.
That sounds like a trifle, but at the edge such a fraction shows plainly. And that is why there are two buffers that neutralise this tolerance - one outside the trim line, the other inward. It is worth remembering that this is neither a machine fault nor carelessness - a small tolerance like this is built into every cutting technology and simply has to be allowed for at the design stage. The first is the bleed, the second the safety margin. Let us meet both, because they are what keeps the print even however far the knife moves.
The bleed - a graphics reserve outward
Imagine your design has a colourful background reaching the very edge. If the background ends exactly on the trim line and the knife wobbles even minimally towards the centre, the border will reveal bare, unprinted paper - that unfortunate white strip. The effect looks sloppy and instantly spoils the impression.
The bleed solves this elegantly. It is graphics extended 3 mm beyond the trim line on each side - an extra strip that will be cut off anyway. Why print something that will go to waste? Precisely so the knife has something to hit. Even if the cut shifts by a hair, the background still reaches beyond the edge, so the colour runs to the very end. The bleed is a buffer that means the white strip has no right to appear.
The bleed applies only to elements meant to reach the edge - backgrounds, full-frame photos, colourful strips. Extend them 3 mm outward. If a design has a white border and nothing reaches the edge, the bleed is not critical - but it is still good to set it, just in case.
The safety margin - a reserve for content inward
The same cutting tolerance works the other way and here the safety margin comes in. It is the gap between the trim line and important content - an internal buffer zone in which nothing essential will land.
What for? Because if text, a logo or a phone number lie right by the edge and the knife shifts towards the centre, they can be cut off or painfully brush the border. The margin moves these elements a safe distance away, so no shift threatens them. We recommend at least 5 mm of gap from the trim line - which is 8 mm measured from the edge of the file with the bleed. Keep everything that must stay whole and look good in this zone.
The margin is also a matter of aesthetics, not only safety. Content stuck to the very edge looks cramped and accidental, as if the design did not fit on the page. A bit of breathing room around the text instantly makes an impression that is more considered and professional. This matters for every product with text - from a flyer to business cards, where a small surface makes every millimetre count. It gets tighter still on loyalty cards, trimmed only to 85×55 mm with rounded corners - the curve takes away part of the corner, so content has to sit further from the edge.
The bleed protects the background from a white strip, the margin protects the content from a cut-off. One guards the outside, the other the inside - and together they make the edge look right.
The three concepts together - how it works in practice
Let us gather this into one picture. You have three zones, looking from the outside inward:
- The bleed (the outer 3 mm beyond the trim line) - here you extend backgrounds and graphics meant to reach the edge. This part will be cut off.
- The trim line - the border of the final format, where the guillotine cuts.
- The safety margin (at least 5 mm inward from the trim line) - here you do NOT place important content; leave this zone empty so nothing gets cut off.
When all three are set correctly, the cut can shift by its permissible fraction of a millimetre and no one will notice - the background still reaches the edge, and the content is still safe. That is the whole philosophy in a nutshell: two reserves that forgive the machine its natural inaccuracy.
The most common mistakes - and how to avoid them
Finally, a short list of the slip-ups we see most often. Knowing them is half the battle, because they are easy to catch before the file goes to print.
Missing bleed. The background ends exactly at the edge, with no reserve. The result: at the slightest shift of the cut a white strip appears. The cure - extend the background 3 mm beyond the format.
Text too close to the edge. A caption or logo right by the border risks being cut off and looks cramped. The cure - move important content into the margin zone, away from the trim line.
Confusing the bleed with the margin. These are two different things: the bleed goes outward (and is cut off), the margin inward (and stays on the print). It is worth remembering, because a mix-up can spoil the design at both ends at once.
As you can see, the whole trio - bleed, margin and trim line - is ordinary, practical logic, not some technical thicket. Once you understand it, you will set these reserves instinctively. You will find more details and ready settings in our guide to preparing files, and we described the whole process step by step in a separate post on how to prepare a file for print. And if you have doubts about a specific design, simply write to us - we will point out what to watch for, and a check by our designer with a preview for approval is an option you pick in the calculator on the product page. It is also worth looking at the post on bleeds and preparing files without mistakes, where we develop the topic with further examples.