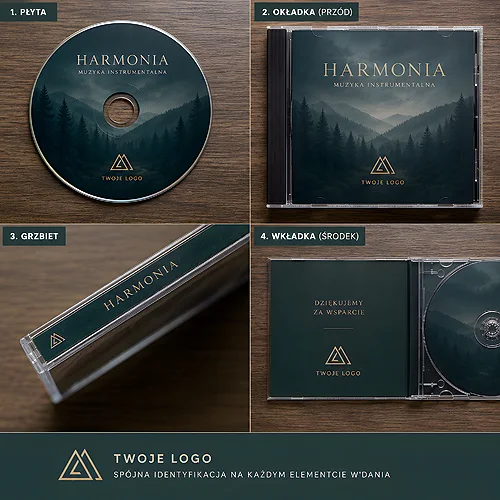
You have a finished recording - an album, a presentation, video material for a client - and one last step remains: labelling the disc. That is when a recurring question shows up. Should you stick on a ready self-adhesive label or order printing directly on the surface of the disc? The difference seems minor, yet it can decide whether the recipient takes the disc for a professional product or a homemade makeshift job.
Both methods have their fans and both can be done nicely. The devil is in the details, though: durability, colour quality, the effect on data reading, and that small impression a recipient picks up in a split second. Below we break both solutions down into their parts so you can choose deliberately, not by gut feeling.
- Direct printing (thermal transfer or digital print on the disc) looks professional and is durable - the graphic becomes part of the disc.
- A self-adhesive label tempts you with simplicity, but over time it may peel, wrinkle and upset the balance of the disc.
- For business use, gifts and releases choose printing - it is what builds the impression of a polished product.
- A sticker is acceptable only for quick, one-off internal uses, not for things someone actually looks at.
- Quality starts with the file: CMYK, bleeds and high resolution matter for both methods.
Direct printing on a disc - a standard that simply looks right
Direct printing is a graphic applied straight onto the surface of the disc, without any extra layer stuck on top. The result is smooth, even and looks like a factory disc known from shop shelves. This is exactly the method recipients subconsciously associate with a professional release.
In practice you will meet two main technologies, and the choice between them depends mostly on the print run and the expected quality.
- UV digital print, offset and screen print - the graphic goes straight onto the top layer of the disc, on a white base and in full colour. It works well for smaller and medium runs when you want good looks without the cost of preparing a large production.
- Replication with printing - the disc is made industrially and the print is part of the process. This is the choice for larger runs, where the repeatability of every copy matters.
If you want a result close to a shop release with fewer copies, printing on CDs and DVDs works well. For large series, where every disc should look identical, it is worth considering CD and DVD replication. Both paths give the same key effect: the graphic is part of the disc, not a stuck-on extra.
Self-adhesive labels - fast, but with traps
A label is a ready disc-shaped sticker you press onto the top of the disc. Its simplicity and availability are tempting - you can print it and apply it almost on the spot. The trouble is that the convenience at the start turns into a few real problems over time.
Durability and looks over time
The glue under the label works. After months a sticker may start lifting at the edges, wrinkling or catching air bubbles. A disc that looked tidy at the start looks neglected after half a year. Direct printing has no such problem - there is nothing to peel off, because the graphic is fused into the surface.
The effect on disc reading
There is also a technical side, easy to forget. A label adds mass to one side of the disc and can upset its balance. In fast drives a badly applied or peeling label can cause reading problems, and in extreme cases it can slide off inside the device. Direct printing does not change the geometry of the disc, so it is simply safer.
If you are facing the choice, ask yourself one question: will anyone look at and keep this disc? If so - a gift, material for a client, a release - go for direct printing. Leave stickers only for quick internal copies that will soon land in the bin anyway.
Which solution looks more professional
The answer here is fairly clear-cut. Direct printing almost always looks more professional, because it mimics what factory discs have accustomed us to. A smooth surface, even colours reaching to the edge and no visible sticker layer - all of it reads as a polished product.
A label carries a subtle signal of being temporary. Even a nicely designed sticker gives away that something was stuck on top. In a business context that matters, because the disc is then an extension of your brand. A few typical situations where printing wins hands down:
- Materials for clients - designs, photos, documentation handed over on a disc represent your company.
- Gifts and keepsakes - a disc with photos from a celebration is meant to last for years, so it should look cared for.
- Releases and portfolios - music, film, a sales presentation - first impressions count everywhere.
- Training and conference materials - a consistent print lifts the reception of the whole pack.
If you want the whole parcel to look coherent, it is worth thinking not only about the disc itself, but also about what you pack it in - more on that in a moment.
The disc is not everything - packaging seals the deal
Even the best print loses out when the disc reaches the recipient in a loose, random sleeve. Packaging is part of the same message and deserves to be treated as seriously as the graphic on the disc. A well-chosen case or digipack makes the whole thing feel like a considered set, rather than a jumble.
For more representative uses a cardboard digipack works brilliantly - it gives plenty of room for consistent graphics and protects the disc better than a thin sleeve. If you are looking for different ways to secure and present a disc, it is worth browsing the available disc packaging and matching it to the character of the project. A disc with a solid print in matching packaging is a completely different level from a sticker in a plastic sleeve.
If you want the graphic on the disc and on the packaging to play toward the same goal, our post on how to design disc printing and a cover consistent with your identity will help. It is also worth looking at a disc more broadly - as a medium that communicates something, as discussed in the post on the disc cover as an advertising surface.
How to prepare for your order - step by step
Whether you go for printing or a sticker, quality starts with the file. The order below will help you avoid disappointment when you receive the finished discs.
- Decide on the method and the run - for representative pieces choose direct printing, for large series consider replication.
- Prepare the design in CMYK - screen colours can differ from print, so work in the CMYK space from the start.
- Prepare a 120 x 120 mm square covered with artwork edge to edge - do not mark the disc shape or the hole, we trim them on our side, so no white rim is left.
- Keep a high resolution - small text and logos must stay sharp, so avoid enlarged low-quality files.
- Think about packaging together with the disc - while designing the disc, plan a matching case or digipack right away.
It comes down to a simple rule: if the disc is to represent anyone, direct printing is a choice you do not regret. A sticker holds up only where speed alone counts and looks do not matter. In every other case the difference in reception is big enough that it is worth spending a little more time on preparation and ordering a print. If you are not sure which route to take with your project, check the full range in the products section or write to us via contact - we will suggest what will work best.